UI description
Describes the UI of the MapEditTool window.
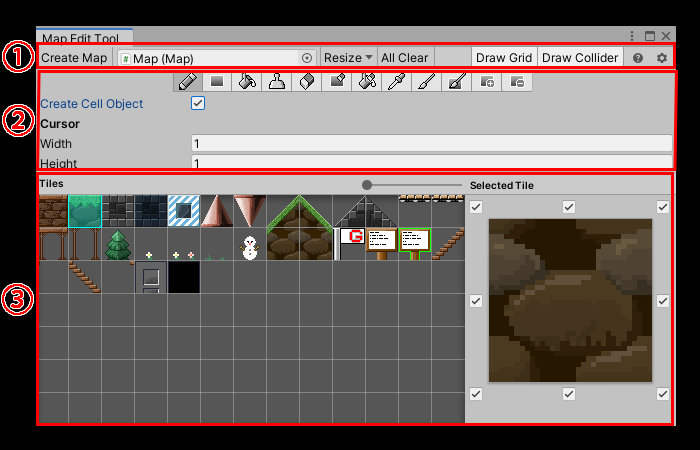
1. Toolbar
Create Map button
Create a GameObject in your scene with the Map component added.
Map selection field
A field for selecting the Map to edit.
In addition to selecting here, if the GameObject selected in the Hierarchy window has a Map component, it will be automatically selected.
Resize dropdown
Drop down the window to resize the map.

| Item | Explanation |
|---|---|
| Size | Set the size of the map |
| Width | Map width |
| Height | Map height |
| Pivot | Specifies the location on which to resize the map. For example, if you widen both the vertical and horizontal widths based on the upper right, cells will be added to the left and bottom edges of the map. |
| Resize button | Resize. |
All Clear button
Erase all tiles placed on the Map.
Draw Grid toggle
Display the grid in the Scene view.
See Preferences for details on grid settings.
Draw Collider toggle
Shows the map collider currently being edited in the Scene view.
Help button
Displays various help menus.
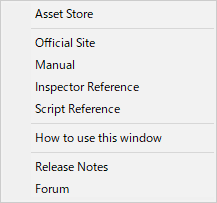
| Menu | Explanation |
|---|---|
| Asset Store | Open the Nostalgia 2 page of the Asset Store |
| Official Site | Open the official website of Nostalgia2 |
| Manual | Open the manual page of the online documentation for Nostalgia2 |
| Inspector Reference | Open the Inspector Reference for Nostalgia2's online documentation |
| Script Reference | Open the script reference for Nostalgia2's online documentation |
| How to use this window | Open the manual page of the MapEditTool window |
| Release Notes | Open the Nostalgia 2 release notes |
| Forum | Open Nostalgia2 Support Forum |
Preferences button
Open Preferences.
See Preferences for more information.
2. Editing tools
A tool for editing Maps.
See Editing Tools for more information.
3. Tile selection
Select the tiles you want to place on the Map.
Tiles
A list of tiles.
Select the tile you want to place from this list.
Selected Tile
The selected tile.
If the tile type is Auto Tile, the part selection toggle for the tile you want to place while holding down the Shift key is also displayed.